|
Equipment There are numerous ways to set up equipment when recording either in a studio or out on location, how you set up your gear is as important as choosing the right microphone and knowing how to edit your sounds afterward. Personally I find that how I setup my gear is a constantly changing part of the job. Experience counts for a lot and often you won't know if something is going to work until you've tried it. New gear will often need new solutions, and recording material you have never encountered before will almost always challenge your current approaches to setting up for a recording session. I don't believe there are any perfect solutions that work for every situation, I try to approach any session with an open mind and see if I can learn something from it. These are some of the solutions I have used and how I found working with them. Using Multiple Microphones Before I go into the various setups it might be worth explaining why I would want to use more than one microphone to record something. There are a couple of reasons why this might be desirable. Firstly different microphones are made for different purposes and they all have an area where they will be more suitable. The sensitivity and pickup pattern will both influence what a microphone is able to record, while its design and construction will influence the quality of sound it will capture. Words such as warm, crisp, clear and full are all used to describe some of the sound characteristics of different microphones, often it is just a personal preference but sometimes there is a very clear choice of which mic is better for a particular situation. Sometimes it is worth using multiple microphones to try and capture all of these sound characteristics, this allows you to mix the various recordings together later and create a final sound that is warm, crisp and clear. The more material you capture, the more options you have to work with. The second aspect is physical ability to capture certain sounds. If I place 5 different microphones at the muzzle of a canon when it is fired it is very likely that some if not all of them will not be able to capture a clean recording. Microphones have limitations to how loud a sound they can capture as well as how fast they respond. A gunshot is a very loud very fast impulse so a suitable mic is needed to capture those elements. The after shock and echo however have different qualities so a different mic might work better. This is less about what might capture better sound characteristics and more just capturing the sound at all.  Multiple mics on a single sound source Finally there things that are just so complex that you need more than one microphone to capture all the sounds. A car is the best example of this. A Hollywood sound team would use at least half a dozen mics to record a car driving. usually you would place at lest one microphone near the exhaust, one int he engine bay, one or more inside the car and then have several others being carried and pointed at the car from a distance. In extreme cases you might then add another to capture the tyres on the road, one near the suspension and several in the engine bay to distinguish between piston noise, fan noise, and pre exhaust output. Each of these microphones might be a different type to bets suit its purpose. Boom Pole Setup Japan The main reason why I adopted this setup in Japan was because it was the gear I had with me at the time. I had previously used a Rycote windshield and shock mount system, but that belonged to the studio I was working for so it stayed with them when I moved to Japan. Initially I had just the mic a basic plastic clip and the boom pole which I had purchased in Australia. A trip to Tokyo allowed me to buy a simple but very cheap suspension system and a fluffy cover to keep out the wind. Now at least I could do some decent outdoor recordings. The way this setup is designed it allows for the boom pole to be extended with the mic on the end. This would allow me to get the mic closer to birds in a tree, or lower the mic down a hole or maneuver it under a vehicle. It greatly increases where I can position the mic. The suspension system stops vibrations from traveling to the mic and corrupting the sounds it records. 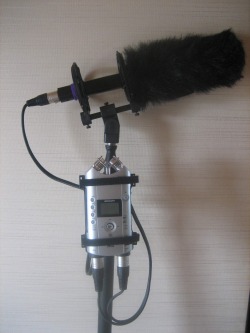 The Zoom H4 has been mounted on the boom pole by attaching the head piece of an old broken camera tripod. The thread mount on the Zoom is designed to screw directly into a camera tripod, so customizing the head pieces to fit on the pole allows for the zoom to be easily screwed on and off. This means my entire recording setup is mounted on pole and so is light, easily portable and makes it much easier to get the mic into unusual locations. I would usually have headphones attached to the Zoom H4, but once I have set levels I can use the setup with nothing else attached to the pole but my hands. I have recorded thousands of sounds with this setup over a 2 year period and it is a very flexible system. Most of the other setups I use are adaptations of this first concept. Boom Pole Setup The current version of the boom pole setup is essentially the same. The basic elastic suspension system has been replaced with a Rode Blimp system. This works much better at isolating the microphone from vibrations and suppressing the effect of wind noise. Wind is probably the biggest issue with outdoor recording so having an effective measure of countering it is well worth the time effort and money to find. The H4N has a screw thread hole in its body case so it doesn't not need a separate mounting plate like the H4 did, it just attaches directly to the tripod head piece mounted on the pole. 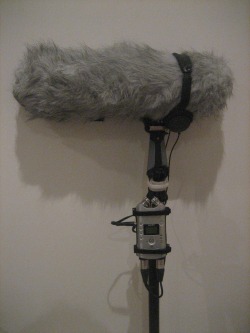 This system is slightly heavier than the setup I used in Japan because the H4N is heavier than the H4 and the Rode Blimp is slightly heavier than the simple shock system. But overall this extra weight is very slight and the advantages of the new setup are quite considerable. Tripod Mount The lessons I learnt adapting the boom pole setup to be practical and easy to use made the tripod mount a natural progression of the idea. Essentially I like the idea of having self contained gear setups without cables getting in the way or getting damaged. The main recurring issue I had with the boom pole was the inability to use both hands when I was recording. On occasion I would prop up the boom pole, or tie it to something so i could work hands free, but these were always less than ideal solutions. I needed two things to make this setup work. The first was easy, I went to the hardware shop, took the H4 Mounting plate with me and found a screw that was the right size to screw into the plate. The second thing I needed was a little harder to find. I wanted a screw adapter that would go between the thread size of a camera tripod to the larger thread size used for microphone clips and stands. Thankfully my local pro audio shop has a large range of various adapters and after 30 minutes of looking through catalogues we found what I needed. I just had to wait a few days for them to order it in. 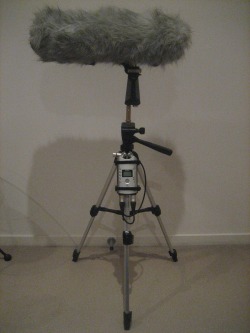 The end result is a screw mounted on one of the tripod legs, this allows the H4 or H4N to be mounted onto the leg of the tripod. The screw adapter on top allows me to mount the Rode Blip (or any microphone clip in fact) to the top of the tripod. This creates a totally independant hands free recording unit which I use very regularly. It also very conveniently attaches to the tripod carry straps on the back of my gear bag, another advantage of buying a bag designed for camera equipment. If I was going to do a large scale project that required a large number of microphones I think I would just replicate this setup over and over rather than have dozens of cables running everywhere. Single Hand Setup This setup came about from a desire to be more mobile and have the option of adding an extra microphone. The boom pole was a very useful setup, but it relied on the pole itself to hold all the components together. This became an issue when I was in a situation where the pole itself was not only not necessary, but actually got in the way. My visit to HMAS Castlemaine was a good example of this. A typical warship does not have large open spaces and nice wide doors that make wielding a big pole practical, so I needed to work without the pole. I had experimented with making various hand grips with thread on both ends so I could attach mics, it generally was more trouble than it was worth. Eventually I used the Rode blimp and screwed a short piece of threaded rod into it that allowed me to add a second mic to the bottom of it. This would allow me to hold the blimp as usual but have an extra mic attached. It was occasionally useful, but became less useful after I lost my Shure Beta 58A as that was my main secondary mic. (It was great for recording animals)  The system now is quite simple. I attach the Zoom H4N to the Blimp by wrapping Velcro straps around them, this allows it to be removed quickly and easily and does no damage to either piece of equipment. It allows me to utilize all four input channels of the H4N, 2 leading from the Blimp with one of my shotguns inside and the two built in mics on the H4N. The Redhead wind shield blocks the wind on the H4N mics and means I have a stereo backup of everything I record. When using a single microphone into a stereo device like the H4 or H4N I set the left and right channels to different levels. By setting one channel at a lower input level it covers me if there is a sudden loud sound. Anything on the main channel that peaks is usually captured on the lower channel without peak distortion.  Zoom H4N attached to Blimp set-up Blimp System The Blimp setup is a suspension mount and wind jammer, it is one of the most important pieces of equipment I use, but perhaps its worth explaining why and showing how it works. Essentially it is designed to isolate a microphone from vibrations and wind noise. These two factors can be responsible for making recordings completely unusable and so it is worth the effort to mitigate them as much as possible. 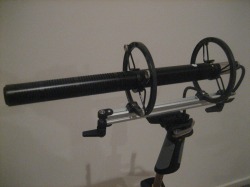 Close up of suspension system Suspension mount The initial part of the system is a pair of clips that you attach to the microphone you wish to use. There are various brands of blimp system available and each will come with a series of different sized clips to allow you to use different sizes and shapes of microphone. The most common mics used in blimps systems are hyper cardioid or "shotgun" mics, but it is possible to use any microphone that will fit into the clips. The clips themselves have small hooks that are attached to special rubber bands. These bands are then attached to the suspension mount. When in use the rubber bands isolate the microphone from vibrations caused by user handling or the environment it is being used in. 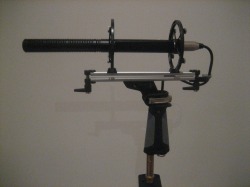 Mic mounted in suspension system Basic system The microphone can be used in the basic setup and is often appropriate for inside close micing. This setup allows the user to handle the mic by holding the pistol grip or mounting it on a boom pole or tripod. Using it in this way allows the mic to be very close to the sound source without the wind cage getting int he way. At this stage the microphone has no protection from wind and so this setup could only be used out doors if it was a very still day. This setup is also slightly lighter than when the cage and fluffy are added. 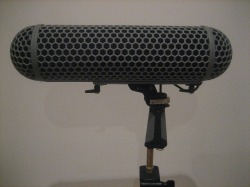 Wind cage added to system Wind cage The wind cage is designed to slide onto the pistol grip and lock in place. The two half sphere ends can both be unscrewed to allow for easier access to the microphone inside. Once the cage is correctly positioned the ends screw on and it is ready to use. The cage is designed to protect the microphone from low level wind and prevent sounds from popping the microphone diaphragm in a similar way a foam cover does. The cage also offers some protection against rain and moisture getting to the mic. It will not protect a mic against a lot of water but it will generally keep light rain off. The disadvantage is that the cage can be a slight barrier if you need to get the microphone very close to a sound source.  Wind jammer 'Fluffy' added to system Wind Jammer The wind jammer is essentially a large fluffy sock that slips over the cage. Strong wind is countered because the wind moves the fluffy fibers rather than blowing against the microphone's diaphragm. Because the fibers are so soft they make no no noise when they are moved by the wind. There is still a limit to how much wind can be managed but generally I find this system can cope with very strong winds. Vehicle Mounts As I mentioned in the section about using multiple mics, vehicles are often so complex that they require a completely different approach to record. Capturing engine sounds can be difficult because they are often very loud and finding secure, safe places to mount microphones on a moving vehicle can be a challenge. While there may be some locations on a vehicle that are generally the same like the exhaust, the engine and the interior it is rare to be able to use the same setup each time. I have found that the higher quality finish and aerodynamic designs of sports cars often mean there are few places to attach microphones to and if you are dealing with an expensive car you are going to be far more conscious of marking or damaging the car in any way. For this reason the best car to test on is your own, get used to the process and experiment with the best positions for mic placement. Things will change when you work with different vehicles, but the basic principles you pick up from your own tests will be helpful. 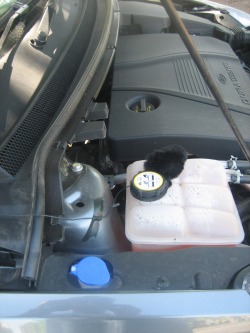 DPA 4061 mounted in engine bay 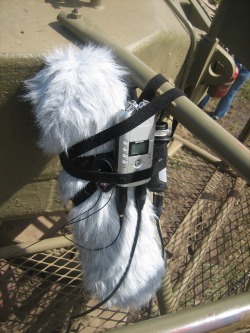 MKH60 and DPA 4061 mounted on tank turret
16 Comments
Location
Docklands Equipment Zoom H4N DPA 4061 pair Today I finally got the chance to test out some new mics I have been thinking about buying. I have heard lots of good reports about DPA mics but I have never used any. They are pretty expensive so I thought it would be a good idea to hire some to test out before I bought any. I found a place nice a close to home that rents out audio equipment and hired a pair for a couple of days to test. Today was literally just testing them out to see what they could do. I did a range of test recordings of speaking and measuring sound levels and comparative signals from foreground to background sounds. I also managed to record a few things I have had lying around waiting to be recorded. I’ll write up a proper review of them soon, but I have to say I fell in love with these mics pretty quickly. They are very sensitive, and have a beautiful crispness to the sound, but at the same time they can cope with extremely loud sound levels. The mics themselves are smaller than my little fingernail, and as such I need to be careful with them, but they also allow me to use microphones in locations that have previously been impossible. Tomorrow I plan on strapping them to a motorbike and a sports car to see just what they can handle. That will be the real test to see if they are worth purchasing. Location Docklands Equipment Zoom H4 Tripod Mount and Zoom H4N D112 mini tripod and R09 I finally picked up the new Zoom H4N this week, although it sat in its box for 3 days because I had no time to get it out and look at it which is really sad. It is going to take me a while to work out exactly what this thing can do but at first glance it has some very nice new features. I’m certainly not going to stop using the H4, but I expect the H4N will become my main unit fairly soon. First big difference is that it does not have the mount with Velcro straps that the H4 has. The H4N has a screw thread directly into the body so I can attach it directly to a tripod without the old mount system. I have moved the H4 mount permanently onto the tripod and the H4N will go on the Boom pole. This will reduce the amount of messing around when I want have different set-ups. The H4N also has access to the memory card directly from the side of the unit, the H4 had access hidden in with the batteries. From a functional point of view the H4N has various different modes including one that allows for input from an external microphone as well as the two on board mics simultaneously. This could be very useful for backup tracks. I’ll add a full review of the H4N to the review section very soon. 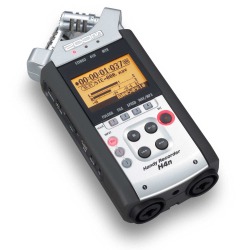 Zoom H4N Today I wanted to do some more water recordings, this time of water slashing on water so I went down to the wharfs again and took all my gear. I used the H4 on the tripod with the MKH 60, and the H4N on the ground with a D112 on a mini tripod as well as using the H4N mics with a fluffy wind cover. I also switched on the R09, but without a wind cover everything it captured was unusable. I then spent about 20 minutes dragging buckets of water out of the bay and throwing it back in to record the splash sounds. When I got back to the studio I found a lot of noise in these recordings. Each set-up seemed to have its own issues. The shotgun mic was pointing out across the harbour area and was in fact picking up construction noise from about a kilometre away. The D112 was not directional enough and so was picking up as much wind as it was splashing, and the H4N mics were positioned too low to the ground to receive anything useful. So even with 6 mics I didn’t really grab anything I want to keep. I am not worried as it is very easy to record this material again, and it was also mainly a test for the new equipment, but ti is interesting to see how even with various pieces of equipment all working together you can not always guarantee a good result. I think recording at night time would be better as the area is often heavy with construction during the day. Traffic will also be less of an issue. I was a very good test and showed various issues I need to deal with.  Gear Setup at Docklands At the same location I wanted to record some water balloons bursting. The sound of the balloons bursting with water was too quick and quite lifeless, but the popping sound when full of air was excellent. The nearby structures provided a really good reverberant echo. It sounded almost like a gunshot. So even though the sound I wanted to capture was not great I got some good sounds. I also captured the sound of one of the pontoon wharfs creaking heavily on my way back. This was probably the best sound of the day, and was completely unexpected.
I used the H4N with the D112 to record several of my sneezes when I got back to the apartment. (I have an awful cold at the moment) My sneezes have always been very loud, but it was somewhat frightening to see that a mic designed specifically to record massive output sounds struggled with my exploding head. I did get a couple of good examples, but I also got several that peaked badly. I also recorded some good domestic sounds, like brushing teeth, and lots of sniffing sounds (courtesy of my cold) I will continue to put the H4N through its paces and see what it can do. |
AuthorStephan Schütze has been recording sounds for over twenty years. This journal logs his thoughts and experiences Categories
All
Archives
April 2019
|
 RSS Feed
